Thursday, February 28, 2013

Membuat Daftar isi blog Secara otomatis


Membuat Daftar isi blog Secara otomatis
Membuat daftar isi blog secara otomatis disini yang maksud adalah, jika kita melakukan postingan baru maka secara otomatis judul blog yang baru akan langsung masuk ke dalam daftar isi tanpa harus melakukan edit pada layout blog kita.Dengan trick ini, kita hanya membutuhkan sedikit tempat di halaman blog kita, karena jika pengunjung ingin melihat daftar isi tersebut, maka akan terbuka jendela baru. Sehingga di halaman blog kita cukup dicantumkan dua kata yaitu : Daftar isi, dan bisa kita letakkan di tempat yang kita inginkan.Caranya seperti langkah-langah berikut ini :LANGKAH PERTAMA1. Log in ke blogger2. Klik Layout di dashboard menu3. Klik Edit HTML4. Beri Centang pada Expand Widget Templates5. Cari kode dibawah ini.

  • <b:include data='post' name='post'/>

6. Ganti Kode diatas dengan kode dibawah ini.
  • <b:if cond='data:blog.homepageUrl != data:blog.url'><b:if cond='data:blog.pageType != "item"'><a expr:href='data:post.url'><div style="padding:6px 0 6px 5px;border-right:1px solid #ccc;border-bottom:1px solid #ccc;margin-bottom:2px;background:#EAE9E9;color:#406A0E;"><data:post.title/></div></a><b:else/><b:include data='post' name='post'/></b:if><b:else/><b:include data='post' name='post'/></b:if>
Kemudian ikuti langkah langkah berikut ini :1. Masuk ke account blogger anda2. Pilih menu tata letak / Layout3. Pilih tambah gatged4. Pilih html/javascrip5. COPAS kode di bawah ini :<a href="http://parlan-go.blogspot.com/search?max-results=200" target="_blank"><span style="font-weight:bold;">DAFTAR ISI</span></a>http://parlan-go.blogspot.com/ Ganti dengan alamat blog andaresults=200 ganti dengan jumlah yang anda inginkan, angka 200 menunjukkan jumlah judul yang akan di tampilkan.

Edit Menu Blog

Cara membuat menu pada Blog


pertama masuk ke bagian edit template sobat, kemudian cari kode ]]></b:skin> ( gunakan F3 agar mempercepat pencarian )
bila sobat sudah menemukan ]]></b:skin> selanjutnya sisipkan kode dibawah ini tepat di atas ]]></b:skin>
ul.menu {list-style-type:none;width:auto;position:relative;display:block;height:33px;font-size:.6em;background:url("https://blogger.googleusercontent.com/img/b/R29vZ2xl/AVvXsEgtOSCMerGMD_8OwN_890LmexkBOj7dyUSQNgNgWz33xm61jelULi6oqoCjgDbTKQkSDFCvpCKY_B4kz_fQcb2P3owM4zzBfBjpC5udxGgXUUHS7Aw42hgjarfIIlYIQVM0ZkfqB0OriHk/s1600/bg.png") repeat-x top left;font-family:Verdana,Helvetica,Arial,sans-serif;border:1px solid #000;margin:0;padding:0;}
ul.menu li {display:block;float:left;margin:0;padding:0;}
ul.menu li a {float:left;color:#A79787;text-decoration:none;height:24px;padding:9px 15px 0;font-weight:normal;}
ul.menu li a:hover,.current {color:#fff;background:url("https://blogger.googleusercontent.com/img/b/R29vZ2xl/AVvXsEgtOSCMerGMD_8OwN_890LmexkBOj7dyUSQNgNgWz33xm61jelULi6oqoCjgDbTKQkSDFCvpCKY_B4kz_fQcb2P3owM4zzBfBjpC5udxGgXUUHS7Aw42hgjarfIIlYIQVM0ZkfqB0OriHk/s1600/bg.png") repeat-x top left;text-decoration:none;}
ul.menu .current a {color:#fff;font-weight:700;}
/*Garis Merah*/
ul.menu.red{background-color:#B11718;}
ul.menu.red li a:hover, .menu.red li.current {background-color:#DE3330;}
kemudian save template.

hal selanjutnya adalah masuk ke bagian tata letak atau tempat menambahkan widget, dan hal terakhir adalah sisipkan kode dibawah ini dimana sobat ingin menu tersebut muncul

<ul class="menu red">
<li class="current"><a href="#(url homepage anda)">Home</a></li>
<li><a href="#">EDIT ME</a></li>
<li><a href="#">EDIT ME </a></li>
<li><a href="#">EDIT ME</a></li>
</ul>
ganti dengan link yang dituju

Editing Blog


how to edit the top blooger horizontal menu, menu bar
or top navigation menu,Blogger Tricks

- Before We Start: 
- You need to be careful while changing your template.
- Before you make any changes, Back up your template and save it at safe
place.
alot of people download new and beautiful blogger templates with top menu added
bet they can't edit, modfy, or even remove it, and today we'll learn how to edit
any blogger template top horizontal menu, what ever the template, we'll seE how
to defined the top menu codes and edit it. editing the top menu links dependes on
finding the menu codes in our template so the first step is to find the menu codes,
actually finding the menu code is the hardest part. so log in to your blogger account,
then click LAYOUT > EDIT HTML . now you are at EDIT HTML page, and here you can
see all you template code. open your blog in a new window and read your top menu
links titles, and see the next picture, i'll use here nice template called : integral
made by blogandweb.com and you can seeit's demo here.
Editing blogger top menu Links
YOU MUST READ THE INSTRUCTIONS ON THE LAST IMAGE. at our tutorial we'll copy the link title "contact us" and now go yo your blogger account page " Edit html" then
if you use FireFox or Internet Explorer or any another Browser click "CTRL + F"
and past the link title that you copied it, and here it our example we'll past the
title " contact us " and click Enter or Clikc Find. the browser must find text match
the title in your template code. please Zoom the next image and read the instructions,
Editing blogger top menu Links
if you selected word like " home " to defined your menu code place in your template
code, let us tell you that it's bad choice because it's too popular word and you'll
find it more than 3 or 4 times in your code, and here we aim to find the menu titles
just to defined the menu code location in our template code, and here is some menu
codes will help you to know the menu code once you see it,
<ul id='menu'>
<li><a accesskey='1' href='#' title=''>Home</a></li>
<li><a accesskey='2' href='#' title=''>Contact
us
</a></li>
<li><a accesskey='3' href='#' title=''>About Us</a></li>
<li><a accesskey='5' href='#' title=''>Edit</a></li>
</ul>
OR
<div id='menu'>
<ul>
<li><a href='#'>Home</a></li>
<li><a href='#'>Blog</a></li>
<li><a href='#'>Photos</a></li>
<li><a href='#'>About</a></li>
<li><a href='#'>Contact
Us
</a></li>
</ul>
</div>
you must find the link title in a form like the last 2 tables, if you find it like
this, then you found your menu code and this is was the hardest part, now lets talk
about how to edit your top navigation menu, so please see the next tables to see
how to edit your top menu and follow the instructions,
<ul id='menu'>
<li><a accesskey='1' href='
Title 1 link URL'
title=''>Tittle 1</a></li>
<li><a accesskey='2' href='Title 2 link URL'
title=''>Tittle 2</a></li>
<li><a accesskey='3' href='Title 3 link URL'
title=''>Tittle 3</a></li>
<li><a accesskey='5' href='Title 4 link URL'
title=''>Tittle 4</a></li>
<li><a accesskey='5' href='Title 5 link URL'
title=''>Tittle 5</a></li>
</ul>
OR
<div id='menu'>
<ul>
<li><a href='Home page link URL'>
Home</a></li>
<li><a href='Blog page link URL'>Blog</a></li>
<li><a href='Photos page link URL'>Photos</a></li>
<li><a href='About page link URL'>About</a></li>
<li><a href='Contact us page link URL'>Contact Us</a></li>
</ul>
</div>
and now i think every thing is clear for you to start editing your blogger top
horizontal navigation menu, and here is a trick you may need to make your contact
us page

Head Text


Login ke BLOGGER
Pilih Template sebaik nya di back up dulu kalau ada salah edit nanti
pilih Edit HTML >> Lanjutkan
Centang dulu Expand Template Widget
Cari kode <head> dengan menggunakan Ctrl+F biar cepat
pasang kode script di bawah ini diatas kode </head>

<b:if cond='data:blog.Url == data:blog.homepageUrl'> <script language='javascript'>alert ("UBAH TULISAN INI SESUAI SELERA KAMU"); </script> </b:if>


Terakhir klik simpan .

Cara Membuat Halaman Beranda / Home di Blogspot


Cara Membuat Halaman Beranda / Home di Blogspot

Cara Membuat Halaman Beranda / Home di Blogspot - Bagaimana caranya membuat halaman Beranda / Home di blogspot? Pertanyaan itu yang saya sering lontarkan pada diriku sendiri sejak memulai berkenalan dengan blog. Setelah beberapa lama mencari di om google, akhirnya pertanyaan tersebut dapat terjawab.

Sebenarnya, ada beberapa cara membuat halaman beranda / home di blogspot, namun yang saya posting kali ini adalah trik paling mudah dan yang saya terapkan di blog ini dan beberapa blog sobat yang pernah kuedit (editor kacangan). Bagaimana saya membuat halaman beranda atau homepage di blog ini?

PEMBERITAHUAN: Setelah template blog ini diubah, cara ini sudah tidak digunakan di blog ini, tetapi fungsinya masih bisa dipake oleh sobat blogger. Terima Kasih :)

Secara garis besar, ada 3 (tiga) hal yang harus dilakukan:
1. Membuat postingan yang umum, yang menjelaskan garis besar isi blog.
2. Merubah format tanggal penerbitan postingan umum tersebut.
3. Merubah jumlah postingan yang muncul pada halaman utama/beranda/homepage.
Berikut Penjelasannya:
1. Membuat postingan yang umum, yang menjelaskan garis besar isi blog.
Pada saat kita melihat (membuka) sebuah website yang memiliki hosting sendiri dan mengklik halaman berandanya, yang muncul adalah halaman index yang berisikan sambutan atau penjelasan secara umum isi website tersebut. Saya berpikir untuk membuat hal yang sama dengan website berbayar itu, padahal hosting blogku di blogger. Apakah ini bisa di lakukan? Jawabnya bisa, sebagai langkah awal adalah membuat postingan yang umum, yang menjelaskan garis besar isi blog (Lihat contohnya di blog ini, silahkan klik "home" menu di atas). Meskipun pada contoh blog ini masih amburadul, tapi untuk memperbaikinya tinggal melakukan 'edit entri'.

2. Merubah format tanggal penerbitan postingan umum tersebut.
Setelah membuat postingan seperti langkah nomor 1 di atas, segera terbitkan kemudian edit kembali. Lihat gambar berikut:
Setelah masuk pada halaman 'edit entri', pilih "postingan umum" tersebut (postingan yang akan dijadikan homepage).
Selanjutnya, jika sudah masuk pada halaman pengeditan, silahkan langsung mengklik "Opsi Entri" atau "Post Options".

Rubah Format tanggal penerbitannya, usahakan di rubah pada tanggal terbaru.

Pada gambar di atas, entri ini diterbitkan pada tanggal 30 bulan 11 tahun 2009. Jika sekarang adalah tanggal 20 bulan 9 tahun 2010, berarti postingan ini akan berada di urutan belakang (jika ada postingan yang lebih baru). Tapi jika format tanggal tersebut dirubah menjadi tanggal 30 bulan 11 tahun 2012, maka tulisan atau entri tersebut akan selalu berada di depan (ingat, pada pengaturan default blogger, postingan terbaru selalu berada di atas).
Nah, jika ingin menjadikan "postingan umum" (yang telah dibuat pada langkah nomor 1) selalu muncul pada halaman beranda atau home, ubahlah tanggalnya "semuda mungkin" (di blog saya ini, saya merubahnya menjadi tanggal 17 Juli 2012 dengan format penulisan "12/07/17"). Untuk melihat hasilnya, perhatikan gambar berikut:

Yang saya beri lingkaran merah adalah "Postingan Umum" milik saya. Meskipun tulisan ini (Cara Membuat Halaman Beranda / Home di Blogspot) lebih belakangan saya posting, tetapi toh "postingan umum" tersebut selalu berada di atas.
Jika sobat telah mengerti dan merubah format tanggalnya, silahkan klik "terbitkan entri".

3. Merubah jumlah postingan yang muncul pada halaman utama/beranda/homepage.
Langkah terakhir adalah mengatur atau merubah jumlah postingan yang muncul pada halaman utama. Caranya,
1. Masuk ke halaman Dasbor, atau klik di sini
2. Masuk Pada halaman "pengaturan"
3. Setelah masuk pada halaman pengaturan, klik "Format"
4. Carilah tulisan "Tampilkan", rubahlah angka yang ada menjadi 1. Perhatikan gambar di bawah:

Pada gambar di atas, angka 5 diubah menjadi 1. Pastikan pada menu dropdownnya pilih 'posting'. Artinya, jika kita memilih angka 1, berarti kita 'memerintahkan' agar jumlah tulisan yang muncul pada halaman utama adalah 1, yaitu tulisan / postingan terbaru. Terakhir, klik Save atau "simpan setelan".

Logikanya, Postingan yang telah dirubah format tanggalnya menjadi format "tanggal terbaru" akan selalu muncul pada halaman Homepage.

Edit Tamplate

1. Masuk ke akun Blogger Anda. 

2. Klik Rancangan > Edit HTML

3. Untuk mem-backup template, silakan klik Download Template Lengkap. Hal ini untuk berjaga-jaga kalau nanti terjadi kesalahan dalam pengeditan. 

4. Cari kode ]]></b:skin> (Gunakan Ctrl + F untuk memudahkan pencarian) 

5. Copy kode di bawah ini dan paste di bawah kode ]]></b:skin> 

<style type='text/css'> 
<b:if cond='data:blog.pageType != &quot;item&quot;'> 
<b:if cond='data:blog.pageType != &quot;static_page&quot;'> 
.post-body{display:none;} 
</b:if> 
</b:if> 
</style> 

6. Klik tombol SIMPAN TEMPLATE

7. Selesai. 

Tamplate Blog


Cara mengganti template blogger, inilah satu hal yang mungkin dipertanyakan oleh blogger pemula, sudah pasti para blogger ingin tampilan blognya lebih keren dan profesional dari pada blog yang tampilannya berantakan, loadingnya berat ataupun tidak ramah sama sekali kepada pengunjung, ada juga yang tampilan blognya disesuaikan dengan kesukaannya contohnya template naruto dan lain-lain.Kenapa ganti template..? mungkin ini yang terjadi pada anda yaitu bosan dengan yang itu-itu aja, pingin template yg lengkap misalnya saja anda ingin template yang mempunyai menu horizantal, menu breadcrumbs, dll sedangkan anda tidak paham dengan edit HTML, dan ada juga karna templatenya rusak karna kesalahan pemasangan widget,gadget dan kesalahan ketika mengedit HTML.
Template seperti apa yang baik dan cocok untuk blog kita ? yaitu template yang anda pilih menurut pilihan anda sendiri dan yang pas dengan hati anda baik itu melalui saran dari teman blogger yang laen ataupun tidak, karna andalah yang tau karakter blog anda.
Bagaimaina cara mengganti template ? anda bisa googling template seseuai dengan selera anda, yang mempunyai format .XML, dan biasanya template berformat .XML ini dicompress dalam format .ZIP maka kita harus mengekstraknya terlebih dahulu. dengan cara klik kanan seperti gambar dibawah ini.
File template anda sudah siap ? selanjutnya masuklah ke akun blogger anda dan arahkan kursor pada blog yang kan anda ganti templatenya klik gambar kertas kemudian pilih template.Kemudian pilih cadangkan/pulihkanKemudian klik browse dan cari file .XML yang telah anda ekstrak tadi.Kemudian klik unggahJika muncul peringatan widget/gadget, pilih saja pertahankan widget/gadget, agar gadget yang terpasang pada blog anda tidak hilang dan tidak susah susah tuk menambahkannya lagi.


Jeep Willys


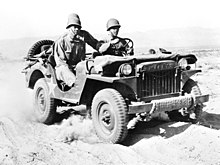
Even though the world had seen widespread mechanisation of the military during World War I, and the US Army had already used 4x4trucks in it, supplied by the Four Wheel Drive Auto Co. (FWD), by the time World War II was dawning, the United States Department of War were still seeking a light, cross-country reconnaissance vehicle.As tensions were heightening around the world in the late 1930s, the U.S. Army asked American automobile manufacturers to tender suggestions to replace its existing, aging light motor vehicles, mostly motorcycles and sidecars but also some Ford Model Ts.This resulted in several prototypes being presented to army officials, such as five Marmon-Herrington 4x4 Fords in 1937, and threeAustin roadsters by American Bantam in 1938 (Fowler, 1993). However, the US Army's requirements were not formalized until July 11, 1940, when 135 U.S. automotive manufacturers were approached to submit a design conforming to the army's specifications for a vehicle the World War II technical manual TM 9-803 described as "... a general purpose, personnel, or cargo carrier especially adaptable for reconnaissance or command, and designated as 1/4-ton 4x4 Truck."Marmon-Herrington converted Ford 1/2 ton truck, sometimes called the "Grandfather of the Jeep"By now the war was under way in Europe, so the Army's need was urgent and demanding[citation needed]. Bids were to be received by July 22, a span of just eleven days. Manufacturers were given 49 days to submit their first prototype and 75 days for completion of 70 test vehicles. The Army's Ordnance Technical Committee specifications were equally demanding: the vehicle would be four-wheel drive, have a crew of three on a wheelbase of no more than 75 (later 80) inches and tracks no more than 47 inches, feature a fold-down windshield, 660 lb payload and be powered by an engine capable of 85 ft·lb (115 N·m) of torque. The most daunting demand, however, was an empty weight of no more than 1,300 lb (590 kg).Only two companies entered: American Bantam Car Company and Willys-Overland Motors. Though Willys-Overland was the low bidder, Bantam received the bid, being the only company committing to deliver a pilot model in 49 days and production examples in 75. Under the leadership of designer Karl Probst, Bantam built their first prototype, dubbed the "Blitz Buggy" (and in retrospect "Old Number One"), and delivered it to the Army vehicle test center at Camp Holabird, Maryland on September 23, 1940. This presented Army officials with the first of what eventually evolved into the World War II U.S. Army Jeeps: the Willys MBand Ford GPW.The Bantam no.1 'Blitz Buggy'Since Bantam did not have the production capacity or fiscal stability to deliver on the scale needed by the War Department, the other two bidders, Ford and Willys, were encouraged to complete their own pilot models for testing. The contract for the new reconnaissance car was to be determined by trials. As testing of the Bantam prototype took place from September 27 to October 16, Ford and Willys technical representatives present at Holabird were given ample opportunity to study the vehicle's performance. Moreover, in order to expedite production, the War Department forwarded the Bantam blueprints to Ford and Willys, claiming the government owned the design. Bantam did not dispute this move due to its precarious financial situation. By November 1940, Ford and Willys each submitted prototypes to compete with the Bantam in the Army's trials. The pilot models, the Willys Quad and the Ford Pygmy, turned out very similar to each other and were joined in testing by Bantam's entry, now evolved into a Mark II called the BRC 60. By then the U.S. and its armed forces were already under such pressure that all three cars were declared acceptable and orders for 1,500 units per company were given for field testing. At this time it was acknowledged the original weight limit (which Bantam had ignored) was unrealistic, and it was raised to 2,160 pounds (980 kg).For these respective pre-production runs, each vehicle received revisions and a new name. Bantam's became the BRC 40, and the company ceased motor vehicle production after the last one was built in December 1941. After reducing the vehicle's weight by 240 pounds, Willys' changed the designation to "MA" for "Military" model "A". The Fords went into production as "GP", with "G" for a "Government" type contract and "P" commonly used by Ford to designate any passenger car with a wheelbase of 80 inches.Willys MA jeep at the Desert Training Center, Indio, CA, June 1942US Military Jeep, Model 1942(used by Military GovernorRamon Magsaysay).By July 1941, the War Department desired to standardize and decided to select a single manufacturer to supply them with the next order for another 16,000 vehicles. Willys won the contract mostly due to its more powerful engine (the "Go Devil") which soldiers raved about, and its lower cost and silhouette. The design features the Bantam and Ford entries had which were an improvement over Willys' were then incorporated into the Willys car, moving it from an "A" designation to "B", thus the "MB" nomenclature. Most notable was a flat wide hood, adapted from Ford GP.By October 1941, it became apparent Willys-Overland could not keep up with production demand and Ford was contracted to produce them as well. The Ford car was then designated GPW, with the "W" referring to the "Willys" licensed design. During World War II, Willys produced 363,000 Jeeps and Ford some 280,000. Approximately 51,000 were exported to the U.S.S.R. under the Lend-Lease program.A further 13,000 (roughly) amphibian jeeps were built by Ford under the name GPA (nicknamed 'Seep' for Sea Jeep). Inspired by the larger DUKW, the vehicle was produced too quickly and proved to be too heavy, too unwieldy, and of insufficient freeboard. In spite of participating successfully in the Sicily landings (July 1943) most GPAs were routed to the U.S.S.R. under the Lend-Lease program. The Soviets were sufficiently pleased with its ability to cross rivers to develop their own version of it after the war (GAZ-46).The Willys US Army Jeep (formally the Truck, 1/4 ton, 4x4) and the Ford GPW were manufactured from 1941 to 1945. These small four-wheel drive utility vehicles are considered the iconic World War II Jeep, and inspired many similar light utility vehicles. Over the years, the World War II Jeep later evolved into the "CJ" civilian Jeep. Its counterpart in the German army was the Volkswagen Kübelwagen first prototyped in 1938, also based on a small automobile, but which used an air-cooled engine and lacked 4 wheel drive


Google AdSense


Cara Mendapatkan Penghasilan dari Google AdSense

Tentu sudah sering dengar kan tentang Google AdSense? Diakui bahwa AdSense adalah sumber penghasilan terbesar dari bisnis online di dunia internet, dan murah karena tanpa modal, dan juga mudah karena tidak butuh kemampuan yang tinggi baik dari sisi marketing maupun IT. Ada seorang publisher sukses, yang hanya dalam waktu kurang dari 6 jam berhasil mendemokan kemampuannya dalam meraih $400 dari Google AdSense ini. Jika hobby browsing, wajib ikut dalam program ini, ya minimal untuk membayar biaya internet, kan lumayan.
Bagaimana sebenarnya logika bisnis ini? Mengapa bisa dengan sesuatu yang murah dan mudah kita mendapatkan penghasilan yang luar biasa, bahkan lebih dari penghasilan utama? Bayangkan seandainya kamu adalah pemilik sebuah stasiun televisi yang banyak pemirsanya, dari mana kamu mendapatkan penghasilan? Tentu saja, di tengah-tengah berbagai program siaran yang disajikan, entah itu sinetron, film, lawak, olahraga dll dan ditonton oleh jutaan orang, di sana akan muncul iklan-iklan, yang bagi sebagian orang tertentu menjadi daya tarik dan akhirnya membeli produk yang ditawarkan oleh iklan tersebut. Apakah iklan-iklan itu gratis untuk tampil di televisi? tentu saja tidak, kalau gratis sih semua orang akan tampil sebagai bintang iklan :) Mereka membayar mahal untuk setiap penampilan iklannya, kepada siapa? tentu saja kepada pemilik stasiun tv tersebut, dalam contoh ini adalah kamu.
Dari analogi di atas, di dunia maya pun berlaku hal yang sama. Saat ini, juta perusahaan yang bergerak di dunia maya, baik itu perusahaan besar, maupun perorangan, butuh promosi untuk memasarkan produknya. Maka dipilihlah perusahaan penengah, contohnya adalah Google, AdBrite, Yahoo, BidAdvertiser, Cbengin, dll yang lewat mereka inilah iklan-iklan tersebut didistribusikan kepada stasiun TV dunia maya, yang tentu saja adalah sebuah situs. Apa saja langkah-langkah untuk menjadi publisher AdSense?
GoogleAdSense.
Berikut adalah langkah-langkah untuk mendapatkan penghasilan dari AdSense (Contoh kasus saya ketika pertama mendaftar di Google AdSense) :
1. Buatlah email di http://www.gmail.com, atau bila sudah punya, gunakan saja, namun email baru khusus untuk adsense ini akan lebih baik.
2. Buatlah sebuah blog, misal di http://www.blogger.com (miliknya google), dari pengalaman, proses penerimaan akan lebih cepat dan kemungkinan besar diterima. Sangat mudah untuk membuat blog ini, kamu bisa browsing untuk tutorial pembuatan blog ini, atau kalau mau, silakan request http://www.facebook.com/baokk untuk mendapatkan tutorial pembuatan blog di blogger ini.
3. Isilah blog dengan artikel berbahasa Inggris, ingat harus berbahasa Inggris, karena ajuan tidak akan diterima bila content tidak berbahasa Inggris. Tidak usah khawatir, banyak situs yang menyediakan content berbahasa Inggris ini, dan siap untuk copy paste, asalkan saja disertakan nama pengarang aslinya, untuk menghindari tuduhan pembajakan. Situs penyedia artikel-artikel ini diantaranya adalah (Pilihlah minimal 7 artikel) :
http://www.articlebiz.com
http://www.articlecity.com
http://www.amazines.com
http://www.findarticles.com
4. Setelah situs ready (contoh situs yang saya ajukan pertama :http://trik-parlan.blogspot.com) maka saatnya mendaftarkan diri di Google AdSense, caranya klik http://www.google.com/adsense
5. Setelah diklik, isilah data-data kamu, khusus untuk Nama dan Negara jangan sampai salah, karena cek yang akan kamu terima tidak akan dapat diuangkan bila dua hal di atas salah. Setelah selesai, tunggulah sampai pihak google melihat situs yang kamu ajukan secara manual (bukan dilakukan oleh software). Lamanya tergantung, saya pernah hanya satu jam, namun ada juga yang sampai 10 hari baru disetujui. Jangan lupa berdoa.
6. Setelah disetujui, loginlah ke google adsense, dan di sana kamu bisa mengkonfigurasikan adsense, memilih format yang paling sesuai dengan space yang disediakan di situs kamu, misalnya saja warna, ukuran, dll. Setelah code javascript kamu copy, kemudian pastekan di situs kamu, yaitu bagian javascript/html.
7. Jangan lupa untuk promosi sana sini, dan juga update artikel. Mungkin ada pertanyaan, apakah mungkin kalau artikelnya comot sana comot sini? Mungkin saja, namun akan ada ratusan bahkan ribuan saingan yang melakukan hal yang sama, jadi hanya akan bertahan beberapa bulan saja. Maka belajarlah buat artikel sendiri dengan bahasa Inggris, serta rajin-rajinlah melakukan update. Dan code adsense ini, bisa kamu tempatkan di situs mana saja, tidak usah hanya di situs yang pertama kamu daftarkan ke google adsense.
8. Goodluck

Kaiser Jeep M715


Kaiser Jeep M715The Kaiser Jeep M715 is an American wheeled military vehicle based upon the civilian Jeep Gladiator. In 1965 the design and developing for the M715 began. The U.S. Government purchased these trucks to replace the M37. Between 1967 and 1969 over 33,000 trucks were produced at the Toledo, Ohio plant. The overhead cam 6 cyl engines were not very reliable due to lack of knowledge on the overhead cam design and lack of maintenance. They had been dropped from civilian models by 1968. The trucks were replaced by the Dodge M880 series.
Kia currently produces an M715-type vehicle named the KM450 for the South Korean Army on license from the U.S. Government. India's Tatra/Vectra is also entering an M715 type vehicle as a candidate for the Indian Army's LSV requirement.In 2010 Mopar developed the concept vehicle Jeep NuKizer 715. It was a tribute to the original M715.


Specifications

  • Length:
  • With winch 220.75 in (5,607 mm)
  • Without winch 209.75 in (5,328 mm)
  • Width: 85 in (2,159 mm)
  • Height:
  • At bed (with cargo cover installed) 87.7 in (2,228 mm)
  • At cab 75 in (1,905 mm), Reducible to 59 in (1,499 mm)
  • Weight: 5,180 lb (2,350 kg)
  • Engine: Inline 6-cyl, 230.5ci overhead camshaft Tornado
  • Horsepower: 132.5 hp (98.8 kW)
  • Transmission: Warner, T-98 four-speed, synchronized manual
  • Transfer case: 2 speed, NP200, 1.91:1 low range
  • Axles:
  • front: Dana 60
  • rear: Dana 70 full-floater
  • ratio: 5.87:1
  • Electrical system: 24 volt utilizing two 12 volt batteries in series
  • Brakes: Hydraulic, 4-wheeled drum
  • Fuel type: gas
  • Fuel capacity: 28 US gal (106 L; 23 imp gal)
  • Top speed: 55 mph (89 km/h)
  • Turning radius: 28 feet (9 m)
  • Tires: 9.00 x 16 8-ply

Bottom Kiri